If You Find a Rock

Today I am sharing a beautiful story with you titled, “If You Find a Rock” by Penny Christian with photographs by Barbara Hirsch Lember.  Who knew rocks influenced our feelings and our life experiences the way that they do?

How many types of rock can you identify in today’s story?

After listening to the story, embark on a rock hunt or a “Chasse au rocher”.  Find rocks that speak to you or try to find as many rocks as possible like those in the story.   Or create a new type of rock!

Don’t forget about ICHI!  On your rock hunt, try to find that one special rock that will be your ICHI rock.  You want to try to find a rock that:

  • you can draw a face on*
  • you can hold in your hand
  • is visible when posed in pictures

*You can also use digital tools to create your face.  More on that tomorrow.

Find here an optional checklist for your rock hunt: If You Find a Rock Rock Hunt Worksheet.  Don’t forget to take pictures of your finds!

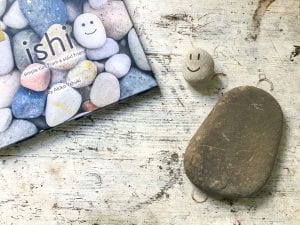
On our rock hunt, M. Zibin found the perfect rock for his ICHI.  He used a permanent black marker to draw its face.  He also found me a beautiful large flat rock.  It’s a beautiful rock because it’s thinner and very flat, like a pancake rock — perfect for artwork .  I will use it for one of my ICHIs but I will find myself a little ICHI today to see what work’s best in my ICHI photo story on Wednesday.

My father found a super cool fossil on a rock hunt here in Cowichan!

Mme Zibin’s father found the fossil here in Cowichan on a rock hunt!

Wishing you a happy hunt,

🙂 Mme Zibin

Monday read Aloud: Ishi: Simple Tips From a Solid Friend by Akiko Yabuki

Bonjour mes amis!
Week of April 27th – May 1st, 2020

I must say, I was blown away by the work you all submitted last week, your creativity blew me away.  If you haven’t seen our Student Gallery, it’s a must see!  

This week is going to rock!  I’m sharing with you the story, “ISHI: Simple Tips From a Solid Friend” by Akiko Yabuki.  From the publisher:

“An award-winning, shareable, cozy hug of a picture book featuring Ishi, an optimistic little rock who reminds readers to choose and share happiness! The ISHI book features a simple rock character which appeals to a wide audience, with valuable lessons in compassion for the self and for others. The FROM / TO page on the inside cover of this picture book encourages the readers to share the book and pass it on with kindness, which creates opportunities for the readers to experience the joy of giving.”

ISHI has a lot of feelings, just like us!  Just as ISHI does, it’s good to recognize how you are feeling and begin to recognize why you may be feeling the way you do.  What is a healthy action you can take to feel better?   As an EMP parent said yesterday, in her family they ask, “What would ISHI do?”

Find today’s reading here:


Today, notice all your feelings.  Notice your stuck feelings, your pressured feelings, your stinky feelings, your bottled up feelings.  What do you do to feel better?

Wednesday we will make our own ISHI’s and illustrate our yucky feelings and our solutions in photos, just like ISHI.  But first, we need to go on a rock hunt!  Tune in tomorrow for a second read aloud before embarking on your hunt.

As Ishi would say, “Be happy.”

🙂 Mme Zibin


Today is Gallery Day

Today is Gallery Day on the blog!

I love Gallery Day.  Student work has been loaded on the Student Gallery Page; to see the mind-blowing  creations visit the Student Gallery page.   Here is just a sampling of the outstanding work from the past week:


I will add all to the work to the Student Gallery page by 3 pm today.  If your child has work they would like to submit, please know I will accept work at any time, there is no deadline.  The only reason I post at 3 on Fridays is to have as much work as possible revealed at once.  I will however, add student work anytime after.

Please see the “Submitting Student Work” Page for more information.

Un grand merci to all those taking part.  I love your work so much!

🙂 Mme Zibin

Build-A-Bug

Today we are going to craft and insect or a bug from recycled materials.  It might be a good idea to listen to “Du Iz Tak” again and observe the bugs: their shapes, their colours and markings.

An image of insects by author and illustrator Carson Ellis
I received some wonderful photos of bug forts from students yesterday – your creativity is outstanding!  I smiled all day long yesterday because of what you created.
It’s time to raid your recycling bin again!

You will need a sturdier base for the body – the cardboard from cereal boxes or the bottom of a clean foam tray.  Both are easy to cut with scissors too.  The rest of the materials listed below are completely optional.  Feel free to use what you can find around the house.

Recyclables and a few craft supplies thrown in!
Materials:
  • cereal,  cracker or granola bar boxes OR
  • styrofoam trays
  • string, yarn, ribbon
  • plastic bottle lids, metal pull tabs and other small recycled bits
  • clear plastic from produce or packaging boxes (optional)
  • beads (optional)
  • pipe cleaners (optional)
  • scissors
  • pencil or marker
  • glue or tape
  • crayons, markers or pencil crayons
  • plain recycled paper and/or patterned paper

Remember: I’m only here to inspire you with a project.  Feel free to use any recycled materials you would like to for the activity.   One of the greatest things about the practice of making is the problem solving involved.  If you don’t have one material you need for a step, what do you have on hand to use in it’s place?

Step-By-Step Instructions

I made two eBooks with the step-by-step instructions on how to make two different style bugs:

Recycled Bugs #1 by Mme Zibin

Recycled Bugs #2 by Mme Zibin

Follow along to build your bugs!

I had a great time creating my bugs: 

Fun with Bugs
  1. Try taking pictures of your bugs in different places.
  2. You can also look through old magazines and add your bugs into the pictures.  What funny pictures can you make?
  3. Place your bug with your fort.  Where is your bug’s favourite spot to hang out?

I would like to thank @recycleandplay on Instagram for the inspiration for Bug #1.

I would like to thank http://manualescanigo.blogspot.com/ for the inspiration for Bug #2.

Tomorrow is Gallery Day!  I am so excited to share with you all the submissions I’ve already received.  If you would like to share your work with others, please see the ” Submitting Student Work” tab at the top of the home page.  I will accept your work at any time.  I hope to post as much work as possible by noon tomorrow, but if you are late with your submission, send it to me anyway at dzibin@sd79.bc.ca.

Have a great time creating today,

🙂 Mme Zibin


Let’s Build a Fort!

Today is the day we make our forts!  It’s raining today — so fort making indoors, while listening to an audio book maybe, sounds lovely.

First, you will need to sketch a design for your fort:
All good builds start with a design idea.

If you are having trouble coming up with ideas, simply google “Toy tree forts” or “Fairy tree forts” under images and a ton of ideas will turn up to inspire you! 

Now if all you wanted to do was draw a fort and stop there, that’s wonderful!

If you would like to continue, go to your recycling box and see what supplies you have in there to help build the base of your fort:
Mme Zibin’s recyclables

If you wanted to make your fort only from the supplies you collected in the forest, that’s fine too!

Mme Zibin’s forest supplies.
If you would like to mix your forest supplies with your recyclables, you have two options:
  1. Just like blocks, you can build and balance all your forest supplies to build a fort, with out using any glue or tape.  In fact, a wonderful challenge would be to build a fort using no adhesives at all.  Use only string and balancing.
  2. Or you could use the following materials to put your fort together:
Materials to put your fort together.

Pictured are the many different ways you could attach items together.  You could also use wire or twist ties or with a parent use hammer and nails — the list is endless!  It’s up to you and your family.

A tip for starting your build with recyclables:

I love paper towel and toilet paper rolls.  I also adore cardboard.  Using a special paper technique, you can build a sturdy base for your fort:

How to cut a flange

and then using glue or tape, attach your flange to your cardboard base:

Flange and base.


Now add all your materials together!

I decided to make fort platforms by hot gluing twigs to a cardboard base:

Fort platform.


I can’t wait to work on my fort today!  I will share my fort with you all on Gallery Day this Friday.

Remember, you can use ANY materials you want to build a fort:
Other ways of making forts.

Being creative and making is the only goal!

I made an ebook for you all to read on fort making.  Find it here:

Making Forts by Mme Zibin.

I look forward to seeing your builds!  Send me your pictures any time.  Please see the “Submitting Student Work” tab at the top of the home page.

Tomorrow, we make recycled bugs and insects.

Enjoy the process today,

🙂 Mme Zibin


A Walk in the Forest for Fort Supplies

Today, let’s #getoutside and take a walk in the forest!   Besides going for a walk, we are also going to hunt for insect fort supplies.

The insect fort built by friends in “Du Iz Tak” by Carson Elliis.

I’ve written an ebook for you to read together as a family, both in English and in French!  The book will let you know what you need and what to hunt for on your walk.  I would like to thank our wonderful EA, Mme Nathalie, for helping with the French translation.

English: A Walk in the Forest by Mme Zibin

French: Une promenade dans la forêt par Mme Zibin et Mme Nathalie.

Book Creator can read to your child in French!

One fabulous feature of Book Creator is that you can have a book read to you in any language.  To have the French read to your child, follow the steps in the short video below:

Once you are home, organize your supplies into categories:

“Rup Furt” supplies gathered in the forest.


and start sketching out some fort ideas!

Think/Empathy/Question:  What do insects need in a fort? 

Design sketches help guide your ideas:

All great designs start with a plan! From “The Most Magnificent Thing” by Ashley Spires.


Iggy drew a bridge plan to help save his class in “Iggy Peck Architect” by Andrea Beaty.


Tomorrow we will gather recyclables from our recycling box and together with our forest finds, build something fun!

*Please note:  All my ideas are merely suggestions.  If a student would prefer building a fort from Lego, or from blankets and pillows, or Keva planks, or blocks, or just draw a fort on paper, it’s all wonderful and just as important.

If you would like to send me a picture of your forest finds and/or your design sketches, please do!  Please see the “Student Submissions” tab a the top of the main page for more information.

À demain,

🙂 Mme Zibin

Monday Read Aloud: Du Iz Tak? By Carson Ellis

Bonjour mes amis!

Week of April 20th – 24th, 2020

It’s hard to believe we are in our second week of library lessons already!  Un grand merci to everyone who visited last week, whether it was to enjoy a story or participate in some of the activities.  Remember, you can send in your work anytime.  I try to post work by a deadline on Fridays, but I’m always able to add work to our Student Gallery as it comes in.

This week’s read aloud is a gorgeous moody story by author and illustrator Carson Ellis.    From the book flap:

” Du Iz Tak?  What is that?”

“As a tiny shoot unfurls, two damselflies peer at it in wonder.  When the plant grows taller, some young beetles arrive.  Could they build a tree fort?

With exquisitely detailed illustrations, an invented language, and tragicomic flair, Carson Ellis invites readers to imagine the dramatic possibilities to be found in even the humblest back yard.“

An Invented Language
Ellis brilliantly develops an insect language in her story. Can you decode it?

When I read the story, try to look carefully at the pictures and words.  There are words repeated often.  Making the connection between the story and what’s happening in the illustrations will help you understand.  It’s just like learning French!   How many words can you and your family figure out?  Feel free to print the worksheet here: Du Iz Tak vocabulary sheet.

Mme Zibin’s Read Aloud

I hope you enjoy my reading of Du Iz Tak!  Please  remember the read aloud is password protected and is the same password as last week.  Please email me at dzibibn@sd79.bc.ca if you need any help.

Weekly Activities

I will be posting later today on the week’s activities, including insect forts and insect making.  It is also Earth Day on Wednesday.  To take care of our earth, the weekly activities include materials found in nature and what we have in our recycling bin.  I hope you’ll join me!

Did you enjoy Du Iz Tak by Carson Ellis?  Let me know what you thought in the comment section below.

🙂 Mme Zibin


Today is Gallery Day

Today is Gallery Day – when we show off all the amazing work you did this past week!  I have created a Student Gallery Page  on the home page of the blog.  You can find the tab for the page at the top right:

Student work will live there and I will add to the page every Friday, with new work posted in the afternoon.

Please see the Submitting Student Work page if you would like to submit your child’s or family’s work.  You can find the tab on the home page.

I really enjoyed my week and I loved the work I have received so far.  Your flowers made me smile.  It was one of the happiest parts of my week.  Merci!

🙂 Mme Zibin

Sidewalk Flowers – Drawn In Chalk

The weather has been so beautiful over the last couple of weeks!  Mother nature is begging us to go outside.  Today, why not go outside and practice drawing the wildflowers on the sidewalk?

Image source: Coopet Photography

Don’t have any sidewalk chalk?  No problem!  How fun would it be to make your own with items you can find in the kitchen?  Check out this DIY recipe here from Books and Giggles.  All you need is cornstarch, food colouring and water!

I made my own sidewalk chalk paint from old chalk I had lying around the house.  I followed the instructions from Rhythms of Play:

Mme Zibin’s old IKEA chalk

Following the instructions, I crushed my chalk in a Ziploc bag with a mallet and made some brilliant coloured chalk powder:

I turned old chalk into chalk powder!

I then slowly added water and mixed the powder to create lovely sidewalk chalk paint.  It was really interesting to see how the chalk powder changed colours.  The bright pink turned into a true red when I added the water.

My homemade sidewalk chalk paint!

I then loaded up my supplies and headed outside!

My tray of sidewalk chalk supplies is ready to go!
Sidewalk Chalk Fun

I found so many beautiful ideas online for sidewalk chalk art featuring flowers:

Image source: Coopet Photography

I love the idea of interactive chalk art!

Why not incorporate an inspirational message into your artwork?

Image source: Pinterest
Image source: www.amyallender.com

I love the chalk message from some of our students at École Mount Prevost:

Notes of encouragement from our ESW students.

In my neighbourhood, today is garbage and recycling day.  To continue with my theme of gratitude and thanks, I left a special chalk message for our North Cowichan sanitation workers:

Mme Zibin’s thank you made with her very own homemade chalk paint!

I had to work quickly because I knew my garbage would be picked up soon.  When the chalk dries, I will go back outside and add some detail to my flowers.  I also have two grocery deliveries today so the “thank you” will go a long way!

Today, get outside and leave something special for others on the pavement.  I would love to see what you create!  If you would like to share your pictures, please see the “Submitting Student Work” tab on the blog main page.  Email me your submissions to me at dzibin@sd79.bc.ca.  Gallery Day is tomorrow – I’d love to share your creativity!

Enjoy the sun,

🙂 Mme Zibin


Drawing Flowers and Spreading Kindness

I’ve posted three videos today: How to draw a forget-me-not flower (introduced species), a daisy flower (introduced species) and a dandelion flower (introduced species).  You can follow along with one video or you can try them all!  At the end of the post, I share how we can help spread kindness to others with our flower doodle art.

1.  The Forget-me-not (le myosotis)

Mme Zibin found a Wood Forget-me-not in her neighbourhood.

In the first video, I show you how to draw a forget-me-not wildflower in doodle form.  Bear with me — it’s the first how-to video I have ever made in my entire life and I made mistakes.  However, mistakes are good; they are  First Attempts In Learning (FAIL) and are natural when you try something new.

Click on the picture below to access the first how-to video:

or follow the link here: https://vimeo.com/408052415

2. The Daisy (la marguerite)

In the second video, I show you how to draw a common daisy wildflower in doodle form.  I found that my second video went a bit smoother for me and was easier to film than my first one.  Yay to progress!

Click on the picture below to access the second how-to video:

or follow the link here: https://vimeo.com/408079161

3. The Dandelion (le pissenlit)

In the third video, I will show you how to draw a dandelion wildflower (or weed, as some adults call it) in doodle form.  I found that my third video was the easiest to make.  However, I made a French mistake in the video and called a dandelion  “le dent de lion” when it is actually called “le pissenlit”.

Click on the picture below to access the third how-to video:

or follow the link here: https://vimeo.com/408097068

Now that we have drawn all these doodles, what can we do with them?

Make Somebody’s Day Brighter – with Art!

In the story we read on Monday, Sidewalk Flowers, Tally gives little gifts of wildflowers to the people around her.  Right now we can’t give as easily with proper social distancing, but we can still spread joy and happiness.

I explain how in the video link here: https://vimeo.com/408111058

Signs I made of flower doodles to show kindness to others.

Using my flower doodles, I made a thank you sign for my mail delivery person:

My community mailbox with my floral doodle sign for the mail delivery person.

I made another sign for the people who delivers my groceries:

My grocery delivery cooler is a little more cheerful now with my flower doodle thank you sign.

Who’s day can you make a little brighter with your flower doodles? I’d love to hear who you shared your art with.  I’d also love to see your art!  If you would like to share your pictures, please see the “Submitting Student Work Tab” on the blog main page.   Email your submissions to me at dzibin@sd79.bc.ca

I hope you enjoyed drawing with me!  I will see you here tomorrow for sidewalk drawing.

Yours in kindness,

🙂 Mme Zibin


Skip to toolbar